Smart City Plan Manual, Tips and Tricks
About the game
How the game works
Tips and Tricks on how to Play
Optimizing Traffic
Reporting bugs
Using mods
Creating mods
About the game
"Smart City Plan" is a modern city builder game: Plan zones, roads, public transport like trains, trams, buses, subways and even the hypertube. Set taxes and policies and implement smart city technologies.Start by creating a few roads and specify zones where your citizens can start building their homes, shops and companies. Once everything runs fine, your can start expanding your city. Extend it by providing public transport for your citizens and implement policies. Ensure everything is taken care for: Pollution, noise, crime, waste, water, energy and so on. Your assistant will help you by guiding your through the process of doing all this easily.
The game is running in real-time, but can be accelerated and paused at any time. Manage policies, track financial data, analyze problems in your city. Expand the city when you have figured out how everything works and manage the public transport system, and build new infrastructure buildings, stations, rails, hypertube tracks, bridges, or even space ports.
How the game works
The game runs in realtime, but you can stop, accelerate or let the game time run in realtime again, using the buttons on the top right:
But the most important part is the mail reader. If you have mail, a blue number is flashing next to it. Click it to open the mail reader. There, you will get important information about the current state, and what to do next.

If you start reading the mails you get in there, and start doing what your assistants are telling you there, you will quickly master the game easily.
Tips and Tricks on how to Play
Here are some tips on how to play:- If you haven't yet, be sure to enable the tutorial. This will show you the basics in the game how to set up your city
- In order to have better, and more modern buildings, be sure to provide all services to your citizens. An area where there is a police, a school, a hospital, a fire station and good public transport will more likely upgrade their buildings
- Industry and commercial areas don't care for hospitals and schools, but need fire fighters, police and public transport to get their workers nearby.
- When designing your street network, try to avoid mutliple intersections right after another. This will quickly cause traffic jams.
- If you have trouble selecting a building which is located behind another large building, then click on the button on the left to make all buildings transparent. In this mode, you can easily click on buildings hidden behind larger ones.

- Unhappy citizens and industries will not pay taxes (or only partially) and not upgrade their buildings
Optimizing Traffic
If you have problems with to much traffic, try this:Always have enough roads. Building more roads and alternative routes between parts of your city will usually help.
When designing your street network, try to avoid mutliple intersections right after another. This will quickly cause traffic jams. See for example here:
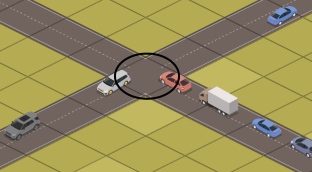
This is an standard intersection. Traffic flows nicely across here.
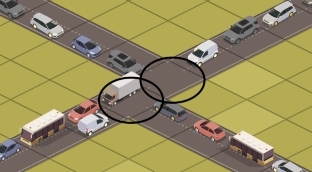
But now see this, if you add more than one intersection right after another one, this will quickly cause jams, so try to prevent this:
Even worse, more than two intersections behind each other:
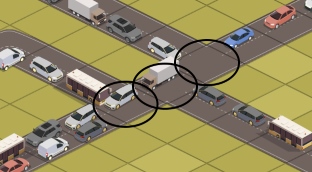
Don't do this. This will stop the nice traffic flow and cause jams quickly.
In order to easily solve traffic jams in the inner city, you can build traffic calming zones. Cars are forced to drive there slowly, and cars will try to avoid this by using different routes.
Reporting bugs
If you want to help to improve the game, you can also help by reporting bugs you discover. If you have a game with a bug or something strange happening, you can also send us the savegame. For getting to the savegame, in Windows, right-click the Windows start button, and select 'Run'. There, type
%localappdata%
and press ENTER. You should find a folder named "Smart City Plan" and under that, a folder named "savegames". You can send the game in question to game@ambieragames.com
Using mods
The game includes the possibility to extend it, and download extensions and plugins (called mods) for it easily. This way, you can for example download new buildings and use them in your city. To download mods, do this:
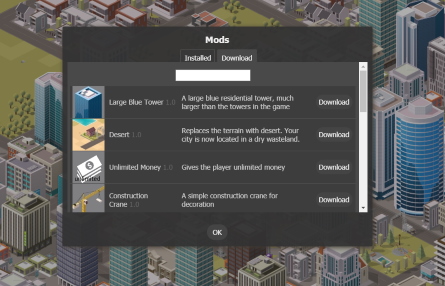
Go to the main menu in the game, click "Settings" and then click "Mods" -> "Download". There, you can select any mod to download and install. You can filter the displayed list of mods by typing any text in the edit field above.
If the mod you installed contains new buildings, you will find the buildings in the 'mod' selection in the building palette when running a game.

Creating mods
You can create mods for the game, and extend it with new buildings, new graphics and even scripts, if you like. Do it like this:
- Download the "Construction Crane" mod. See using mods for how to do this.
- In Windows, right-click the Windows start button in the task bar, and select 'Run'. There, type
%localappdata%
and press ENTER. You should find a folder named "Smart City Plan" and under that, a folder named "mods". A folder named "construction crane" should be in there, which contains the just downloaded "Construction Crane" mod. - Copy the "construction crane" folder and name it how you want your mod to be called, like "my mod".
- Go into your new "my mod" folder and take a look at its content. You will find these files:
- icon.jpg - an icon for the mod
- crane.png - The image of the new building
- mod.json - a text file in JSON format containing all the info about this mod.
- Open the mod.json file with a text editor, like the free Notepad++ editor. It will look like this:
{
    "file":             "construction crane",
    "description":      "A simple construction crane for decoration",
    "version":          "1.0",
    "buildings":
        [
            {
                "Name": "Construction Crane",
                "Description" : "A construction crane for decoration purposes",
                "Id" : 7001,
                "Width": 2,
                "Height": 2,
                "Image": "crane.png",
                "Price": 100000,
                "UpkeepCost": 0,
                "MaxResidents": 0,
                "MaxWorkers": 0,
                "CommercialNeedFullfilled": 0,
                "WaterNeeded": 0,
                "PowerNeeded": 0,
                "NeedsRoadAccess": false,
                "NoiseRadius": 0,
                "PollutionRadius": 0,
                "PublicTransportRadius": 0,
                "HealthRadius": 0,
                "CrimeRadius" : 0,
                "FireRadius" : 0,
                "LeisureRadius": 0,
                "EducationRadius" : 0,
                "ReligionRadius" : 0
            }
        ]
}
You can edit this freely. Assign a new building image, set a name and description. Here are some notes for the various attributes:- Id: An integer number, this must be a unique id. No other building should have the same number.
- Width, Height: Width and height in tiles for this building. Maximum is 6x6.
- Image: Png image of this building.
- WaterNeeded, PowerNeeded: Only set this if MaxResidents and MaxWorkers is 0. Otherwise this will be calculated based on the amount of people living/working here.
- [x]Radius: Radius affecting a specific issue.
- You can of course have more than one new building per mod. For this, add another building object contained in curly braces ( { } ) below the 'buildings' entry, like this:
{ "buildings": [ { "Name": "Building 1", "Id" : 7001, ... }, { "Name": "Building 2", "Id" : 7002, ... } ] } - Once you have your mod ready, you can startup the game and see it in action. If there is a problem with your mod, the game will show the problem in the mod browser.
When you update your mod, you don't need to restart the game, in most cases it is enough to hit the 'Update' button in the mod browser.
Note: Don't click the 'uninstall' button. Your mod will be deleted from disk then.
Submitting your mod to the public
If you want your mod to be played by other people and be visible in the mod browser on the "download" tab, do it like this:- Be sure that you have a nice icon, and an updated description and the correct file name entry in the "mod.json" file.
- Create a .zip file of your mod folder.
- Send the file to game@ambieragames.com and add this text to confirm that you own all the rights to the included assets, and that you license your mod to be used for free by all users and the game:
I [INSERT NAME HERE], confirm that I created this mod for the game "Smart City Plan" and grant permission to anyone to use this mod and included images and texts for any purpose, including commercial applications, and to alter it and redistribute it freely.
Mods replacing existing graphics
You can also create mods which replace graphics from the existing game, not only add new buildings to it. For this, create a mod with a mod.json file looking like this:{
"file": "new water pump",
"description": "new graphics for the water pump",
"version": "1.0",
"replacedGraphics":
[
{
"replace": "pump_1x1",
"with": "newpump.png"
}
]
}
This replaces the graphics of the water pump with a new image in newpump.png. Images which can be replaced are these:
sand, sand_stone_small, sand_stone_big, sand_cactus, mud, grass, grass_bright, grass_stone,
grass_tree, grass_tree2, grass_tree3, asphalt_tram, burned, asphalt, asphalt_street_lr,
 asphalt_street_tb, asphalt_street_x, asphalt_street_trn_1, asphalt_street_trn_2,
 asphalt_street_trn_3, asphalt_street_trn_4, asphalt_street_jnc_1,
 asphalt_street_jnc_2, asphalt_street_jnc_3, asphalt_street_jnc_4,
 bridge_street_begin1, bridge_street_begin2, bridge_street_begin3, bridge_street_begin4,
 bridge_rail_begin1, bridge_rail_begin2, bridge_rail_begin3, bridge_rail_begin4,
 bridge_tram_begin1, bridge_tram_begin2, bridge_tram_begin3, bridge_tram_begin4,
 zone_1, zone_2, zone_4, zone_5, zone_6, zone_7, zone_3, rail_lr, rail_tb, rail_x,
 rail_trn_1, rail_trn_2, rail_trn_3, rail_trn_4, rail_jnc_1, rail_jnc_2, rail_jnc_3,
 rail_jnc_4, rail_lr_asphalt, rail_tb_asphalt, rail_crossing_1, rail_crossing_2,
 tram_lr, tram_tb, tram_x, tram_trn_1, tram_trn_2, tram_trn_3, tram_trn_4, tram_jnc_1,
 tram_jnc_2, tram_jnc_3, tram_jnc_4, asphalt, asphalt, asphalt, asphalt, asphalt,
 asphalt, asphalt, asphalt, asphalt, asphalt, asphalt, subrail_lr, subrail_tb, subrail_x,
 subrail_trn_1, subrail_trn_2, subrail_trn_3, subrail_trn_4, subrail_jnc_1, subrail_jnc_2,
 subrail_jnc_3, subrail_jnc_4, pipe_lr, pipe_tb, pipe_x, pipe_trn_1, pipe_trn_2, pipe_trn_3,
 pipe_trn_4, pipe_jnc_1, pipe_jnc_2, pipe_jnc_3, pipe_jnc_4, power_lr, power_tb, power_x,
 power_trn_1, power_trn_2, power_trn_3, power_trn_4, power_jnc_1, power_jnc_2, power_jnc_3,
 power_jnc_4, powerplant_wind, powerplant_solar, powerplant_solarthermal, powerplant_coal,
 powerplant_nuclear, powerplant_fusion, water, water_start, water_start_2, water_start_3,
 water_start_4, water_edge_1, water_edge_2, water_edge_3, water_edge_4, water_corner_1,
 water_corner_2, water_corner_3, water_corner_4, debug_size_tile, debug_size_tile2,
 asphalt, cursor, cursorbad, badtilemark, buildoverlay, buildoverlayradius, marker,
 train_station_t1, train_station_t2, train_station_t3, train_station_t4, train_station_t4,
 train_station_t5, train_station_t6, train_station_t7, train_station_t5, train_station_a1,
 train_station_a2, train_station_b1, train_station_b2, police_small, police_big, fire_small,
 fire_big, hospital_small, hospital_big, hyper_station_1a, hyper_station_1b, subway,
 tram_station1, tram_station2, bus_station1, bus_station2, bus_stationb1, bus_stationb2,
 launch_pad, airport, car_factory, chem_factory, coal_mine, pump_1x1, pump_2x2,
 pump_drain_1, pump_drain_2, pump_drain_3, pump_drain_4, watertreatment_3x3, school_1,
 school_2, school_3, library, park2x2, park3x3, church1, church2, stadion, stadion2,
 cinema, building_1x1_l1_h1, building_1x1_l1_h2, building_1x1_l2_h1, building_1x1_l2_h2,
 building_1x1_l2_h3, building_2x2_l1_h1, building_2x2_l1_h2, building_2x2_l1_h3,
 building_2x2_l2_h1, building_2x2_l2_h2, building_2x2_l2_h3, building_2x2_l2_h4,
 building_2x2_l2_h5, building_2x2_l2_h6, building_2x2_l2_h7, building_2x2_l2_h8,
 building_3x3_l3_h1, building_3x3_l3_h2, building_3x3_l3_h3, building_3x3_l3_h4,
 building_3x3_l3_h5, building_3x3_l3_h6, building_3x3_l3_h7, building_3x3_t1_h1,
 building_3x3_t1_h2, building_3x3_t1_h3, building_3x3_t1_h4, building_3x3_t1_h5,
 building_2x2_l1_h4, building_2x2_l1_h5, building_3x3_x1, building_3x3_x2,
 building_3x3_x3, building_3x3_x4, building_2x2_x5, building_3x3_x6, building_2x2_x7,
 building_2x2_x8, building_3x3_x11, building_2x2_x12, building_2x2_x13, building_2x2_x14,
 building_2x2_x15, building_3x3_x19, building_1x1_l3_h8, building_1x1_l3_h9,
 building_1x1_l3_h10, building_1x1_l3_h11, building_2x2_l3_h2, building_1x1_l2_h3b,
 building_1x1_l2_h2b, ind_1x1_l1_h1, ind_1x1_l1_h2, ind_1x1_l1_h3, ind_1x1_l2_h1,
 ind_1x1_l2_h2, ind_1x1_l2_h3, ind_2x2_l1_h1, ind_2x2_l1_h2, ind_2x2_l1_h3, ind_2x2_l2_h1,
 ind_2x2_l2_h2, ind_2x2_l2_h3, ind_2x2_l2_h4, ind_3x3_l1_h1, ind_3x3_l1_h2, ind_3x3_l2_h1,
 ind_3x3_l2_h2, ind_3x3_l2_h3, com_1x1_l1_h1, com_1x1_l1_h2, com_1x1_l1_h3, com_1x1_l1_h4,
 com_1x1_l1_h5, com_2x2_l1_h1, com_2x2_l1_h5, com_2x2_l1_h3, com_3x3_l1_h1, com_3x3_l1_h2,
 com_3x3_l1_h3, com_1x1_l1_h6, com_1x1_l1_h7, com_2x2_l1_h4, com_2x2_l1_h2, farm_2x2_h1,
 farm_2x2_h2, farm_3x3_h1, farm_1x1_h1, farm_1x1_h2, farm_1x1_h3, farm_1x1_h4, free_area_item_1,
 free_area_item_2, free_area_item_3, free_area_item_4, free_area_item_5, free_area_item_6,
 free_area_item_7, free_area_item_8, free_area_item_9, upclhouse_1, upclhouse_2, upclhouse_3,
 upclhouse_4, building_3x3_l3_h1_green, building_3x3_l3_h4_green, building_3x3_t1_h1_green,
 building_3x3_t1_h3_green, building_3x3_t1_h4_green, building_2x2_x12_green,
 building_2x2_x13_green, building_3x3_l3_h2_green, building_3x3_t1_h2_green,
 building_3x3_x2_green, building_3x3_x11_green, watertreatment_5x5.
You can of course also still include new buildings additionally in there as well, in a "buildings" section. For an example mod doing this, take a look at the "Desert" mod.
Mods with scripts
You can also add some game logic in your mod by supplying a script. Scripts are done using JavaScript, and defined in the mod.json file like this:{
"file": "my script mod",
"description": "a mod for testing scripts",
"version": "1.0",
"script": "script.js"
}
So your mod also needs to have a script file included, in this case named "script.js". Put this code into there, just for trying it out:
new function()
{
	this.LastTimeRan = 0;	// last time this mod ran

	this.run = function()    // <- called about ~30 times per second by the game
	{
		var now = game_get_time();
		if (now - this.LastTimeRan < 120) // only run every 120 minutes in game time
			return;

		this.LastTimeRan = now;

		game_send_mail('Population: ' + game_get_city().Population, 'hourly report');
	};
}
This code will send a mail every two game hours to the player, with the current population amount of the city. Not very useful, but good as example code.
It works like this: You need to define a function object, which has a method named 'run'. This is being called every game logic step. In there, you can do your game logic and access and manipulate the game.
Here is a list of most basic functions which are available to you:
- game_get_city()
Returns the city object. Contains everything to get infos about the city and to modify it. Example:
game_send_mail("City Population:" + game_get_city().Population, );
Another example, to set the money:
game_get_city().Money = 23; // this is 23 thousand $ - game_get_time()
returns game time in minutes (1440 minutes is a day). You can get a displayable day/time by doing this:
var hours = Math.floor(time / 60);
var days = Math.floor(hours / 24);
hours -= (days * 24);
var timeAsString = "Day:" + day + " Hours:" + hours; - game_open_dev_console()
Opens the debugging developer console. This is useful for inspecting game objects and available functions. (See in the API docs - how to debug a mod) - game_send_mail(txt, subject)
Sends a mail to the user. Takes text and subject as string. Text can be HTML Code.
For a detailed description of the mod API, see the official Smart City Plan mod API documentation.